How to Fix USB Device Not Recognized in windows

In time, when you plug yours USB device to your windows, you maybe receive pop up massage. If your USB device is not detected, then this pop up will show you how you can repair this issue.

How to Fix USB Device Not Recognized in windows


- A simple way is restart of the windows computer. Unplug your USB. Restart and plug in and see if it works. If it does not, shut down your computer, wait for a few minutes and then start your computer again.

- Disconnect your other USB’s, connect this one and see if it helps.

- Run device manager and select action tab, and click Scan for hardware changes and see if help.

- Check if you need to update your drivers. Open Control Panel > Printers and devices. Check if you can see any entry for Unidentified USB device or Unknown Device. Open its Properties and update its driver, if an update is found to be available.


By allow the computer to turn a device to save power.

Run the Hardware and Device Troubleshooter or the Windows USB Troubleshooter and check if it helps. The automated tools check the hardware or USB connected to the computer for any known issues and fix them automatically

How to Fix USB Device Not Recognized in windows

Maybe this posting will continue to next post


Posted in: , , | Posted by :

How to Start Windows 8 in Safe Mode

How to Start Windows 8 in Safe Mode 1

Windows 8 is the latest operating system from Microsoft which is the latest product after Windows 7. Unlike its predecessor, Windows 8 is a touch-based operating system. No wonder that how to use Windows 8 also have differences compared to Windows 7 or Windows XP.

Compared with Windows 7, of how to use Windows 8 will differ greatly. Perhaps even many users of Windows computers are not familiar with how to use the features of Microsoft's latest operating system is.

So even the case when we want to get into safe mode on Windows 8. How to enter safe mode in Windows 8 will be much different when compared to the previous Windows products. Typically, Windows users simply press the F8 key at boot time to be able to access safe mode. But this way it will not be done in Windows 8.

This is because a computer that uses Windows 8 has a short boot time. Especially if you have been using SSD and UEFI firmware. Happens, you will not have time to press the F8 key. Especially on Windows 8, go into safe mode takes the process a little longer. Then how to use Windows 8 to get into safe mode? The following are steps that can You do:


How to Start Windows 8 in Safe Mode 2


• The first step, Press Shift + Restart

• The second step, the next page will appear asking you to choose three options. Select Troubleshoot

• The third step, after entering into the Troubleshoot option, there are three options and select Advanced Options

• Step four, You will get more options and select the Startup Settings option

• Step five, further information will appear if there is an option to replace the restart Windows. These include the Safe mode is enabled. Here, you select Restart button

• Steps to six, after the restart, will appear nine of these are options including Safe Mode, Safe Mode with Networking, and Safe Mode with Command Prompt. You can choose safe mode option you want liking. For example, if you want to safe mode, then press the F5 key. Or pressing the F6 key to Safe Mode with networking option.

After all the above process is done, then the computer or tablet Windows 8 belongs you will be included in Safe Mode with a view that is not much different than previous versions of Windows. Furthermore, if you want to get out of Safe Mode, then just reboot. After reboot, the computer will boot normally.


Posted in: , , | Posted by :

How to Fix IP Address Conflict

IP Address Conflict is usually temporary, but usually these issues will be completed by itself. In this paper we will discuss what is causing this problem and how to deal with it.

How to Fix IP Address Conflict 1

Suppose that at the moment we are using the computer and suddenly notice "There Is an IP address conflict with another system on the network". At that point we realized that we are no longer able to access the Internet, the connection to be disconnected and can not be used anymore.

Things like this often happens to a lot of users in the network and an error message is displayed seems not much help to resolve this issue. Unfortunately, this conflict is temporary and will be finished by itself. However, we do not know when this will happen and usually does not occur when the settlement was too, takes time, sometimes need to reboot to eliminate the problem.
          
To be able to resolve the IP address conflict issues, need to understand first what exactly the conflict. To be able to communicate in a network, a system must have an IP address and must be unique, at least in our own network. If two devices have the same IP address will be detected and then the second network interface devices they will be turned off resulting in lost connections, until the conflict is resolved. So, what exactly is causing this conflict? A common issue is if the two systems are given identical IP addresses statically (manually). This generally occurs on the network that do not apply the system DHCP (Dynamic Host Control Protocol), as we often encounter on the network with DHCP kecil.Server scale are also commonly found in almost all routers use a set of IP Address as prepared (called a scope) so that he could distribute the addresses to respond to the request. However, the scope of the DHCP by default in most existing router, occupying the entire address is available, then one device that uses a static address in the network will lead to conflict, if the address has been given by the DHCP server to other users. We can minimize the possibility of conflict by reducing the number of addresses stored in the DHCP server pool (reduce scope), to fit the needs at that time. Thus, we still leaves a bunch of other addresses that can be assigned statically if necessary.
           
The IP address conflict issues will still arise even if we have chosen not to use static addressing, and fully implement automatic addressing through DHCP server. For example, in some cases we may have more than one DHCP server has been configured with the same settings, so they can overlap addressing. This often happens if we have some wireless access points or other network devices that also have a DHCP server in it and will work immediately when switched on. Therefore should we have only one DHCP server and make sure the other device has been turned off.
           
Other causes that lead to the problem of conflict is when a system back online from standby or hibernate state, especially if the system is a network of different members of the network when he revived. An example of this condition is when the notebook was alive and is part of a network in the office, brought into condition by or hibernates and then revived in other offices that have different network. Conflicts will arise if it turns addressing the network configuration is the same as the configuration of the previous office.
           
If the cause of the conflict that has been discussed above could have been avoided, the conflict would still occur malfunctions may occur if the DHCP server is used, which leads to loss of records on addressing system used. It is common in most routers.


Here's an easy way to change the ip address of your computer:
Click "Start" - "Run" and type "cmd" and press enter, simply click on the Windows 7 Start and type cmd in the box "Search Programs and Files".
Then type the command:

ipconfig / release

Then a window will appear as below

Then type the command again:

ipconfig / renew

The command "ipconfig / renew" This will create a new ip on our computers, in case of conflict ip, if not he would reuse the same ip previously.

To find ip what we wear, simply type the command:
ipconfig

You are still using the "Command Prompt" where we can also change the IP address of the computer we use the command "Netsh"
For those who use static ip of telecoms speedy, usually we are given a public ip itself, to change the ip can use the command:
netsh Set IP Address "local area connection" static 10.10.10.5 10.10.10.1 255.255.255.0 1
that
Local area connection = name of local computer networks
10.10.10.5 = ip address of your computer
= 255.255.255.0 subnet ip address our computer
10.10.10.1 = Gateway

1 = Address IP Gateway specified, usually always start number 1, depending on the setting masing2 router (eg gateway 10.10.10.1 - so figure that is loaded is 1)
If the ip address of the computer that we will change is in connection wireless / wifi eat the name "local area connections" we change it to "Wireless Network Connections" tegantung whether the name is already exchanged anything yet.
Then to replace its DNS servers follow the following command:

Netsh Interface IP Set dns "local area connection" static 110.137.8.2

where:
110.137.8.2 = dns server
Then if your computer will automatically use the ip address given by the router (DHCP) Type the command:
Netsh Interface IP Set Address "local area connection" DHCP

Then set dns also follow DHCP


Netsh Interface IP Set dns "local area connection" DHCP

Okay, so lets do it :D


Posted in: | Posted by :

How To Give Password To Folder and protect your folder

How to Give Password to Folder and protect your folders can be done easily, either using software or not. A folder containing documents in word or pdf files of important data in the form it needs to be secured from the hands of ignorant office friends, classmates, or even your own family members. Surely not want dong suppose we've created office tasks or coursework then suddenly the data is copied by your friend? Maybe your friends grounded just borrow your laptop and it will not open up important files, but who knows if it is misused? This would be very annoying. Therefore we need to secure our data in order not to arbitrarily open by someone else by limiting access to the folder that contains important data. Then how do I give the password folder on your computer? There are two ways this can be achieved, namely:

How To Give Password To Folder and protect your folder


Give the folder password without software
This step can be taken if you want to give the password without the help of software, so that you only utilize the existing facilities on the computer. This can be done for computers that operate on the Windows operating system yes. Here are the steps.

1. Open notepad, for the uninitiated notepad located in the Start -> All Programs -> accesorries -> notepad

2. Copy the code below and paste it into notepad

cls
ECHO OFF
title Folder Locker
if EXIST "Control Panel. {21EC2020-3AEA-1069-A2DD-08002B30309D}" goto UNLOCK
if NOT EXIST Locker goto MDLOCKER
: CONFIRMED
echo Are you sure u want to Lock the folder (Y / N)
set / p "cho =>"
if% cho% == Y goto LOCK
if% cho% == y goto LOCK
if% cho% == n goto END
echo Invalid choice.
goto CONFIRM
: LOCK
ren Locker "Control Panel. {21EC2020-3AEA-1069-A2DD-08002B30309D}"
attrib + h + s "Control Panel. {21EC2020-3AEA-1069-A2DD-08002B30309D}"
echo Folder locked
goto End
: UNLOCK
echo Enter password to unlock the folder
set / p "pass =>"
if NOT% pass% == TYPEPASSWORD goto FAIL
attrib -s -h "Control Panel. {21EC2020-3AEA-1069-A2DD-08002B30309D}"
ren "Control Panel. {21EC2020-3AEA-1069-A2DD-08002B30309D}" Locker
echo Folder Unlocked successfully
goto End
: FAIL
echo Invalid password
goto end
: MDLOCKER
md Locker
echo Locker created successfully
goto End

: End

3. In the code TYPEPASSWORD replace the text with the password that you wish

4. Keep a notepad by clicking File and then Save As, and save it with the name lock.bat save as type to All Files.

5. Open the file that we just open, wait a minute it will appear a new folder named Locker.

6. Move the files you want to secure into the Locker folder

7. Double-click again on the file lock.bat it will display a dialog if you want to lock the folder, type Y and then Enter

8. Folder Locker will be lost, but do not worry because this folder is hidden only by the system

9. To bring it back, double-click on lock.bat then be asked for a password to open it, type in your password and press Enter

10. Folder Locker has resurfaced and you can already see the file again.


Posted in: | Posted by :

How To Use Laptop Battery For Long Life

How To Use Laptop Battery For Long Life

Energy Saving Tips Laptop
Laptops require energy to maximize its performance. But with its continuous flow of electricity on a laptop or computer can cause the breakdown of the expenditure of energy. On this occasion, I will share tips on how to save energy or laptop.

Listen following 9 tips that you can use to save energy consumption and laptops, electrical energy is guaranteed you will not be broken in use.

1. Set the monitor brightness and contrast


Possible for the lay person or a beginner in using computers, they rarely pay attention to their monitor settings. What is meant in this case is the level of illumination and contrast set too high will be able to spend a lot of energy. So for that you should be able to adjust the brightness and contrast, to adjust the monitor brightness and contrast using the button at the bottom of the monitor.

2. Turn off the monitor

The tips of the two is to turn off the monitor, especially the monitor type is the type of CRT (Cathode Ray Tubel), because these types of monitors consume more electricity. So, if you want to leave the laptop for a long time, you should turn off your monitor.

You can also setting up Windows to automatically direct die within a certain time, it can be done in a way, click "Control Panel-Options". In the "Power Options Properties" tab click the "Power Schemes". Then click the arrow in the "Power Schemes" and select "Home / Office desk". Then select the desired time on the "Turn Off Monitor" and click "Apply" and "OK".

3. Turn off hard disks

Although we are not doing anything on your computer, but your data will always be read from the hard disk (by the operating system and some applications). For this reason, the hard disk hard disk will be constantly spinning and of course this will consume energy. If you want to leave your laptop in a long time, then you should turn off your laptop hard disk. In the "Power Options Properties" and then click the "Power Schemes". Click the arrow in the "Power Schemes" and select "Home / Off desk". Then click "Turn off hard disks" and select the time. Then click "Apply" and "Ok".

4. Turn off other equipment

Turn off other equipment such as, speakers, external modems, scanners, Zip drives and printers. Because the equipment it is to spend a lot of energy. Often people leave the equipment in an active state, even when we were out for a long time.

5. Hibernate Mode


Hibernate mode is the facility to shut down, but not close or shut down the application that we are open earlier. This can be done by Mode "Hibernate". With this mode, the contents of main memory (RAM) will be stored in the hard disk. How to do the hibernate mode is as follows, the "Power Options" tab click on "Hibernate". Then click the close box "Enable Hibernation". Also click on the "Advanced" tab. In the "When I press the power button" and then click the arrows then click the "Hibernate". Click "Apply" and "Ok". After that press the "Power" on your computer. Hibernate mode is functioning, press the "Power" once again, your computer will turn on and will automatically open the application you have open earlier.

6. Standby Mode

In order to save energy, we recommend setting your monitor and hard disks are in the lowest part in standby mode. If you want to leave the laptop for a while, you should activate the standby mode. But you should know is, when the active standby mode data have not you save may be damaged or lost if your laptop is damaged. We recommend that you first save your data or documents before you activate this standby mode. Standby mode can be done in a way, click the "Start-Turn Off Computer" and click "Standby".

7. Battery Laptop

If you charge the battery of the laptop, make sure his charge process is complete. Because the charge that carried a half-half and then resumed, it will actually spend a lot of energy. If you want to travel, you should take 2 battery. To minimize battery consumption, you can use the features of Hibernate / Suspended or use an electric socket that plugs into a wall outlet.

8. USB Port


If while you are using the laptop and then you insert one into the USB port on your laptop, you should immediately released when it's finished it. Because the equipment is still plugged in the USB port, it can also spend energy on your PC or laptop. Should remove it if that’s enough of usage.

9. Scheme Energy consumption Laptop

Usually a laptop manufacturer also includes features and power management software. This software is very useful for the consumer laptop, because the software is able to regulate the use of a battery and electrical power is being used. In this software there are several options that can be used to determine the load of hard disks and other energy that is being used by the laptop. Among know the speed of the processor or monitor the proper lighting to be able to save the battery. This software also can be a watchdog for us to use a laptop.


Thus article 10 Energy Saving Tips Laptop and PC, hopefully this article can be helpful and useful for you. Thank you for visiting this blog.


Posted in: | Posted by :

How to Check Your Graphics Card

How to Check Your Graphics Card 2

How to Check Your Graphics Card

The above questions can be found frequently in the forum question and answer forum like Yahoo Answers, Google Ask etc. By knowing the details of the components on your PC, especially VGA card certainly has a lot of advantages to you, such as: you can easily find files Update VGA Driver for hardware devices that you use.

Because of the experience, when downloading the update file for the VGA driver, which prompted course VGA details Spoken like: Model, Series, Vendors, Operating System used. In order for the file you downloaded is not for other devices. If you download a driver until the incident to another device, be sure you use the hardware will not function properly.

To know the details of your PC VGA, there are two options you can use, using the manual method or using the services of a software specially designed to detect the type of VGA installed (installed) in a PC.

How To Manual
His name also means the manual, so there should be little effort to do so. Check back box or wrap perangkaht hardware VGA (VGA Card) that you buy either the Vendor (nVidia or AMD), Sub Vendor (Asus, Gigabyte, EVGA etc) Code and the series, I'm sure all the hardware devices are already listed in the box.

If the box or the packaging has been lost or depleted due eaten cat, you can see the information available on the graphics card, with a look at the code and the series of VGA card, you just try to unplug and notice the details.
using Software
This way one can only be done if the device you are using the VGA hardware is already installed in the system (drivers already installed). Software used is the GPU Z.

GPU Z is a mini tool from Techpowerup which is a software to provide complete information about the Video Card (graphics) and Procecsor APU on a computer or laptop.

GPU Z suport for all types of flat form either VGA AMD, Nvidia, and Intel, including the latest Intel Haswell Processor Graphics fed Code Name Iris.
Key Features of the GPU Z, among others:
1. Suport for AMD, Nvidia, and Intel Graphics
2. Displays VGA Display Adapter you use
3. Displaying the Default Clock and Clock Bost
4. Can be used to perform Back up Bios
5. No need to install, but there is an option if you want to put it on the Install system
6. Suport Windows XP, Windows 7, and Windows 8
After the run GPU Z will feature everything you need about you use VGA as product name, Series, GPU, Memory, etc. all of which are displayed in a tab. The following image is a screenshot of the display when running GPU Z

How to Check Your Graphics Card 1


For those of you who want to and do not have a GPU Z, please follow the following link, and the file size is only 1.3 MB only.

Then if the GPU Z can only be used after the driver is installed, what if after buying VGA Card Used and we want to get a driver for the VGA card that I use but do not know for sure what the full specification of the VGA card Such?

The solution that I can give no 3, namely:
First way, if you are the user-made Assus VGA card, then on the official website there is the convenience provided to users who do not know for sure the hardware used.

Second way, users of AMD graphics cards can easily downloading drivers for all AMD products, with the help of tools designed specifically to detect, locate the driver that corresponds to the hardware, and download it directly to you.

Third way, for AMD and nVidia users who are not working anymore with the two options I mentioned earlier, please use the software detect the driver will install the drivers for all kinds of hardware very well.

Well how readers of all, I hope this article can help you in knowing the details of the VGA that you use either the PC or laptop....

Posted in: , | Posted by :

How to Fix a Slow Computer Windows 7

How to Fix a Slow Computer Windows 7 - 1

On this time I will explain How to solve Windows 7 slow. Initially when I wear my windows xp computer is running normally. Due to the increasing number of users of Windows 7 finally I had come to switch to Windows 7.

After I install Windows 7 operating system and its applications that I like, and I was already operate windows 7, playing in windows 7 turns my computer becomes slow. That possibly due to the specification is a standard computer. I get information about using the Windows 7 computer specifications must be high. But computers with lower specifications can also be addressed in some way. Finally, I tried to find a solution to overcome the slow Windows 7. Here is a solution to overcome the slow Windows 7:

Disable / turn off some of the visual effects features are not so necessary. The following are the steps:
- Open the windows explorer
- Next Right click on the computer.
- Then you select properties.
- Then click the advanced system settings.
- So the system properties window will appear later on the advanced tab click settings on the performance.
- After that remove the entire checkmark there except the bottom after it was ok.
- The last restart the computer.

if you had done that, but the computer / laptop still slow. then immediately upgrade your device. Perhaps this your component is not to upgrade, like RAM, VGA card, and Processors

Posted in: , | Posted by :

How to Burn CD or DVD Room Without Nero

If you are a Windows XP user who has switched to windows 7. And when you want to make a cd and install nero burning first. However, we can really do without nero burning disk in Windows 7. Since Windows 7 has updated some software and add a built-in program. That cd burning application. And this time I will post how to do burn a cd using the default Windows 7 program.
How to burn the data to cd or dvd

1. The first - you have to prepare all the data what will be your backup.

2. then you enter empty cd / dvd dvd-room it.

3. after that copy paste your data that you want to backup to drive cd / dvd room

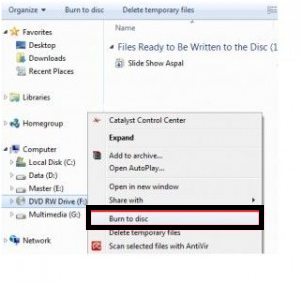
4. At Last, you just right-click cd / dvd and select burn to disc, see example image


And wait until finish.

Note : Always check size of your cd/dvd room


Posted in: | Posted by :

How To Overcome Slow Computer

This time I will pass on information on How to Easily Overcome Slow Computer. Actually there are many ways to do so that your computer or laptop becomes slow. In posting this article I will present a way that I think is easier to cope with the computer so as not to slow again.


How to overcome the slow computer on windows xp or windows 7 same but there is a tiny fraction of difference. But if you are familiar with the windows it will be easy to recognize the difference.
Easy Ways How to Overcome Slow Computer?
Here is how to cope with a slow computer:

1. Check the program / ​​application that takes quite a lot of memory. To check can be through 'Task Manager'.
Ctrl + Alt + Del -> Task Manager -> tab "Process"
Through the task manager it will show an application using the memory. Please close / close / end process unneeded programs.

2. Too many modules that are installed will make a slow computer. Often Sometimes we install a lot of modules to perform a task, especially a student, or anyone who wants to trial and error. It makes the application so that the application does not accumulate Although Often used. You can examine any module already installed on your computer by clicking the add / remove modules in a carry out row as well as un-install programs / applications that Became just the accessories.

3. For Windows 7, if still slow you can do the following:
Control Panel -> Performance Information and Tools (use the search feature) -> Adjust Visual Effects.

On the tab "Visual Effects", select "Adjust for best performance". Alternatively, you can uncheck the list located at the bottom. It was to eliminate the visual display is not needed so much memory consumption is reduced and the computer will be faster.

4. Take advantage of the defragment feature.
This time trying to do the "Disk Defragment". In the search box in the start type "Defragment" and press Enter.
After that defragment the hard drive is.

5. Remove files that are not necessary located in prefect.
How: Open explorer -> C: // windows / prefetch -> delete all files in the prefetch folder.
6. Use CCleaner. Please download CCleaner on the website.

That is the information that I can say about Easy Ways to Overcome Slow Computer hopefully can solve your problem.


Posted in: | Posted by :

How to Fix External HDD Not Detected

Never before have we encountered is an external hard drive not readable by Windows 8 or Windows 7, even replace it with a new cable was plugged with branches usb 2 but usb external hard drive still unreadable. It could be because the external hard drive may have been weak because it's long and it could be because a lot of data that needs to format.

Maybe this is the cause:
1. Drivers external hard drive is not recognized, it can be due to an error the file system on the external HDD
2. The USB port is damaged; this could be physical damage - even if uncommon - or problem drivers
3. The external HDD is not getting enough power supply
4. Driver Windows troubled
Maybe you must check this way:

-Does Driver detected?

Once a device is plugging it into a USB port, Windows will try to recognize the device. Try plugging your HDD into a USB port, if there is the on / off switch, turn it off and then on again. See if Windows recognizes it. Have a look in Windows Explorer if your HDD has appeared as a new drive. If not detected also try with how Disk Management.
Here is how to use Disk Management.
Press Windows + R, type "diskmgmt.msc" in the Run dialog field, then Press ENTER.

How to Fix External HDD Not Detected

You will see a list of drives Windows Disk Management. Even if it does not appear on your computer. In Disk Management, you can format it, set the partition, rename drives, etc.

Move / plug in your external hard drive to another USB port. If after removing them readable, then maybe your USB ports previously get problem. If you use a USB hub, try connecting directly to your laptop / pc your's. Usually this is a problem because the USB hub can not provide sufficient power to your HDD.

Try to check in the Device Manager. To open press the Windows key on your keyboard and then type device manager in the search windows and press Enter.
How to Fix External HDD Not Detected 1

Look Disk drive and see there. If there is a yellow exclamation mark, then the problem is the driver. Then install it your usb driver to resolve the issue. You can also reinstall the driver for external hard drive usb usually required driver is usb 3.0 drivers.


If by the way - still way above it could be and still not detected. Chances are your's external hard drive that is problematic or damaged. My suggestion is to go the nearest service center / place your's buy External Hard drive, ask why not try to be detected and replaced if yours external hard drive still in warranty.


Posted in: | Posted by :

How To Partition A Hard Drive

Once we've installed the windows, sometimes we forget to divide your hard drive into several local disks. So here we are using the default Windows software, namely hard disk partition.

So, I'll give you an illustration to divide the hard disk into several partitions using local disk

I have a 320 GB hard drive which only has 2 local disk. one for the operating system and the other for data. So, I want to partition the local disk of the contents of its data to the local disk for music storage

So here's the structure of a capacity of my hard drive.

- Local Disk C = 50 Gb
- Local Disk D = 270 Gb and 50 Gb left
- Local Disk Local Disk E = new by utilizing left of the Local Disk D

Now Start Local Disk Setup Process Him

1. The first step you right click my computer or a computer in the start menu or explorer then click manage

2. The following window appears click the storage of your computer management> disk management (local)

3. Right-click on the partition D and then click shrink.
4.
How To Partition A Hard Drive

5. Now enter the amount in parts ... there is left the free space available on the partition D, you just enter the number you want is less than has been indicated.
6. If it is click shrink and once passed for a new partition format can be used
7. Finished you already have a new partition
8. If you want to create a local disk or deleting a partition, you can arrange it in this menu by right clicking on the partition that you created or you want to delete

9. Finish

Okay, I think it's all. Please Share this Article To Social Media :D


Posted in: | Posted by :

How to Show Hidden Files on Flash Drive

Have you experienced the following, Size flash looks full, but no files in it, do you think having a large size? Or no file at all. This maybe suspected as a virus, because ye are not systematically missing files, but only hidden by the virus, and still remains within the flash.

Surely it would feel annoying if it is within the flash there are a lot of important files, such as theses, papers, papers or other documents. However, the problem is not any way to be able to display the contents of the flash is hidden.

Therefore, I will give you tips on how if we are experiencing such conditions.
The following stages:

First
Scan and clean first flash infected by a virus, and you should make sure that the flash was indeed free from viruses.

Second
Then, Disable your Antivirus for a while, it is useful to have no clash if the process thereafter

Third
Open CMD by going to start, then click run the Command Prompt window will appear

Fourth
In the Command Prompt window type the attrib -s -h F :. / s / d, In the letter F simply replaced Letter and adjust its path as the one on your computer.  I mean letter path of yours flashdisk

Fifth
If you're feeling confident, now please press Enter

Sixth

Make sure that after pressing the Enter key, cmd not writing code again, which means that only appears Letter C: \ again, and it indicates that the success 


Posted in: | Posted by :

How to Fix Dead Motherboard with this noob skill

How to Fix Dead Motherboard with this noob skill

In many cases damage to the computer when the computer does not turn on someone who intends repair its own computer makes more damage than the damage that already exists. Every one of devices computer repairs is always a way of its own and that is often a problem. The prospective technicians look for damage to the memory, for example, in terms of damage to the power supply. This is called fault diagnosis and repairs computer errors procedures. Then if the computer is off at all, how the repair procedure?
CASE: The computer is off at all, all the indicator lights are lit none. Where is the damage? The first logic that must be owned is that the computer can only be turn on if there is power supply.
solution:

Procedure 1 Are electricity in your home is not off the lights turn on alias? When the computer is turned on during the day and the computer will not turn on, do not always directly tamper with the power supply cable. Make sure in advance that the electricity in your home not being problematic.

Procedure 2: If the above procedure 1 was certainly not a problem then it means causes the computer will not turn on because the power is not there. The next step, which is responsible for the electric power supply cable and the power supply itself. Check the power cord and power supply if need be tested with a multimeter to ensure that the cable is not broken.

Procedure 3: Test Powersuply. If the power supply cord was confirmed well, then that should be in the next check is the power supply itself. Make sure that the power supply is not a problem, for example if the cord is properly installed on the mainboard, not to loose etc..

Procedure 4: Check the power button on the computer. If it is confirmed power supply is still good, then the next step is to check all the keys on the CPU duty conduct electricity, among others; * Power button key (old model). * Power switch ignition power supply (usually at the front of the computer). * Power
turn on the power strip, surge protector, or UPS (if you have one).

Procedure 5: Check the mainboard. If steps 1-4 above also does not resolve the problem, then we entered the mainboard to be checked. Ensure that all other hardware wiring is properly attached to the mainboard, especially the output of the power supply cable. If you suspect there, should be removed first and then put back with convincing.

Procedure 6: Check Processor. If you are sure that the mainboard has no problem and the computer still on strike, most of your first check is next Processor. In all cases I have found (power supply and the mainboard is still well) the only device that makes the computer does not react at all when the power button is pressed Processor. Other hardware such as memory are often damaged and not vga freezes the computer at all. If memory or vga damaged, still no reaction on the computer but not perfect.

Procedure 7: Mainboard is damaged. If at point 6 above you are sure that the processor is still well (certainly through test trials) and there is also a computer does not respond then I became very confident that the mainboard. If this is you have to replace your mainboard

Procedure 8 Check the monitor. After passing through stage 7 above, had no response and CPU indicator light is on, the fan and the power supply has no display at all then it means the problem is on the monitor around. Make sure the monitor is connected properly. Make sure the VGA cable to the monitor is still well and well attached.

Procedure 9 Other damage. After 8 steps above and your computer is on and normal road operating system then your problem is completed.
NOTE AGAIN: If in the first step above 8 computer is on but not normal, for example only a blue screen appears with the words you do not understand. Maybe you should look at before-previous post


I think maybe it's just that it should be considered to repair the total dead computer


Posted in: | Posted by :

Fix Computer Blue Screen of Death With My Way

Blue Screen of Death is a problem that often - often encountered in Windows XP operating system. Perhaps many thought when a computer is exposed to the BSOD we need to reinstall the operating system and some have had to buy a new computer. whereas many ways to fix the BSOD. Although usually BSOD problems most often encountered in the software, but there are less problems in the hardware related BSOD. And maybe this is some of my tips to avoid BSOD:


1.Check that minimum amount of free space available on your Windows partition (C :) is usaually. Blue Screen of Death can happen if there is not enough free space on your Windows partition.

2 Run anti-virus and anti-spyware. You should run your Adware program to check that your computer is clean of adware or spyware Some viruses can cause a Blue Screen of Death, especially those that infect the master boot record (MBR) or boot sector. Anti-virus software you have to be up to date at all times.

3.Update Windows. Microsoft released patches and service packs for the operating system they may contain fixes for the cause of the Blue Screen of Death. Missing updates can be a source of error stopped.

4.Check driver. Update drivers for your hardware, because of the high percent of Blue Screens of Death is a hardware or driver related so that a driver update can fix the cause of the STOP error. If you have recently updated a driver, you may be able to use the driver rollback to return to the previous driver version.

5.Return hardware settings to default in the Device Manager. Unless you have a specific reason to do so, the system resources that a single piece of hardware is set up to use the Device Manager should be set to default. Non-standard hardware settings can cause a Blue Screen of Death.

6.Check BIOS. Load BIOS default values​​. One of the BIOS settings can cause resource conflicts and timing issues. Maybe you need to update the BIOS after adding new hardware can help to fix your PC. A BIOS overclock or not properly configured can cause all kinds of random issues, including BSODs. In this case you need to revert to the default BIOS.

7 Repair your Windows Registry. Run the registry cleaner software to scan the registry, and fix errors. Blue screen error can be related to Windows registry problems. Blue Screen of Death can be caused by, invalid registry entries that are broken and dangerous.

8.Check all internal cables, cards, and other components. They need to be installed and seated properly. Hardware that is not securely in place may cause a Blue Screen of Death so try reseating the following and then examine the STOP message again:
Replace all internal data and power cables
Replace the memory module
Replace any expansion cards

9.Run memory test to check your computer's RAM. Memory errors can cause a BSOD, so see if your RAM is error free. Vista and Windows 7 have a built-in option to test memor

Posted in: | Posted by :
Showing posts with label How To. Show all posts